Precision is paramount when remodeling a kitchen. This comprehensive guide empowers homeowners to master the art of accurate measurements, transforming their kitchen renovation dreams into reality. From essential tools to creating detailed floor plans, it covers every crucial step. By following this expert advice, readers will sidestep common pitfalls, ensuring a smooth installation process and a stunning final result. Whether a DIY enthusiast or a first-time renovator, this guide is the key to unlocking a stress-free kitchen transformation.
Tools and Materials for Measuring Kitchen Cabinets
Accurate measurements are crucial for a seamless kitchen cabinet installation, and the right tools can make all the difference. You’ll need a retractable tape measure (at least 25 feet), a level for even surfaces, a straight edge or ruler for precision, and a notepad or digital device to jot down dimensions.
For your floor plan, grab some graph paper for layout sketches, a pencil and eraser for quick adjustments, and a ruler or scale to keep everything proportional. With these essentials, you can measure wall lengths, address floor or ceiling discrepancies, check cabinet heights, and visualize your space effectively. This preparation ensures a smooth and successful installation process.
Clear Out the Kitchen Area
Start by clearing the kitchen, removing all items from countertops, appliances, and cabinets, and relocating them to a designated space like the living or dining room. This creates more room to work and helps you visualize the area without distractions.
If replacing old cabinets, remove them before taking measurements for a clearer view of the available space. If you’re unsure about removal, consider hiring a professional. Take note of any styles, materials, and hardware you want to keep, measuring drawer pulls or cabinet knobs for proper alignment with new cabinets.
Also, assess the kitchen’s lighting and electrical outlet placement to ensure new upper cabinets won’t block light sources. Measure the distance from the floor to the outlets for easy access during installation. Finally, consider special features like crown molding or baseboards, ensuring your measurements accommodate these elements for a seamless look in your redesigned kitchen.
Crafting the Perfect Kitchen Blueprint: A Sketch to Success
When it comes to kitchen remodeling, a well-crafted floor plan is the secret ingredient. This crucial first step sets the stage for a seamless cabinet measuring process and brings the vision to life. Savvy homeowners create their culinary masterpieces on paper using graph paper or digital design apps, where each square represents a foot and each line a wall, allowing the kitchen to take shape before their eyes.
As the kitchen’s contours emerge, walls are sketched, and corners defined. Fixed elements like appliances and windows find their place, while electrical outlets and plumbing fixtures dot the landscape like culinary constellations. Precise measurements transform the sketch from fantasy to feasibility, with arrows and labels flowing across the page to ensure every inch is accounted for.
With the basics in place, it’s time for the pièce de résistance – the cabinets. Whether dreaming of sleek shaker styles or ornate designs, homeowners can now see their kitchen come to life, one cabinet at a time. This compact blueprint becomes the north star for the entire renovation, guiding decisions and inspiring creativity. It’s not just a sketch; it’s the first taste of a brand-new kitchen.
Measuring the Overall Dimensions of the Kitchen Space
Embarking on a kitchen cabinet measurement journey begins with accurately capturing the overall dimensions of the kitchen, a crucial first step that serves as the project’s blueprint.
- Length and Width
Equipped with a tape measure, the first task is to measure the room’s length and width. Starting from one corner, extend the tape straight along the wall to the opposite corner, ensuring it remains level for an accurate reading.
- Height from Floor to Ceiling
Next, measure the height from floor to ceiling, which is essential for planning upper cabinets. Adjust the tape measure to reach the ceiling corner and note the height.
- Measuring at Multiple Points
It’s wise to take multiple measurements along each wall, especially in older homes where irregularities may exist. For instance, while measuring a long wall, variations in width due to settling revealed the importance of capturing accurate dimensions.
- Documenting Overall Kitchen Footprint
With all dimensions noted, sketch a simple outline of the kitchen layout on graph paper, representing its 12-foot by 10-foot footprint. This visual aid not only records measurements but also helps clarify the space being worked with.
While it may seem straightforward, accurately measuring kitchen dimensions is vital. Understanding the precise length, width, and height aids in selecting cabinets, determining counter heights, and ensuring a smooth flow within the kitchen.
When tackling a kitchen remodel, accurate measurements of walls, windows, and doors are essential for a successful cabinet installation. Here’s a quick guide on how to measure these key elements effectively:
Measuring the Walls
Start with the walls. Use a tape measure to determine the length of each wall, placing one end at the corner and stretching it to the adjoining wall. For consistency, measure at 36 inches off the ground—this height aligns with standard cabinet placement.
Measuring Windows
Next, measure the windows. For width, position the tape from the left edge of the frame to the right, noting it down (e.g., 3 feet wide). Then, measure the height from the sill to the top of the frame (e.g., 4 feet tall) and record the distance from the window bottom to the countertop (e.g., 18 inches). This information is crucial for ensuring upper cabinets don’t block natural light.
Measuring Doors
Finally, assess the doors. Measure both width (e.g., 2.5 feet) and height (e.g., 6.5 feet) of the kitchen entry door. Pay attention to how far it swings open; if it opens inward, you can place cabinets alongside without obstruction. Also, note the distance from the doorframe to the adjacent wall (e.g., 1 foot) to plan cabinetry placement effectively.
Recording Everything
Throughout this process, jot down each measurement in a notebook, organizing them by walls, windows, and doors. Label them clearly with arrows connecting to your rough floor plan for easy reference. This meticulous approach will help avoid costly mistakes and ensure a seamless kitchen design!
Unlocking the Kitchen Cabinet Conundrum: A Measuring Guide
Lower cabinets take center stage first, with the ideal height of 36 inches, creating the perfect balance between countertop space and accessibility. The standard 24-inch depth provides ample storage, while width measurements ensure a snug fit along your kitchen walls.
Upper cabinets follow suit, typically hanging 18 inches above the countertop. Our expert recommends standard depths of 12 to 15 inches, but don’t be afraid to go custom for extra storage space. Aligning upper and lower cabinets is key to achieving that polished, professional look.
Measuring for Appliances and Fixtures: A Kitchen Remodel Essential
When undertaking a kitchen remodel, precise measurements for appliances and fixtures are crucial to ensure seamless integration with new cabinetry, enhancing both functionality and aesthetics. This process involves carefully measuring refrigerators, stoves, dishwashers, and sinks while also considering important clearance requirements.
- For refrigerators, measure height from floor to top, width across the widest point (including handles), and depth from the back wall to the front edge, allowing for door clearance. A typical refrigerator might measure 36 inches wide, 70 inches tall, and 30 inches deep, with an extra inch or two on the sides for airflow.
- Stove measurements include height from floor to range top, width (typically 30 inches), and depth from the back wall to where the knobs begin. A standard range might be 30 inches wide, 36 inches tall, and 25 inches deep, requiring adequate surrounding space.
- Dishwashers usually require measurements from floor to countertop for height, width (typically 24 inches), and depth from countertop front to back wall. A common dishwasher might measure 34 inches tall, 24 inches wide, and 24 inches deep, needing space to open freely.
- Sinks, often serving as the kitchen’s centerpiece, require careful attention to cutout size and depth. For example, a sink might need a 30 x 20-inch cutout with a 10-inch depth.
- Beyond actual sizes, clearance around appliances is vital for proper function and airflow. Leave at least 1 inch on either side of a built-in refrigerator and ensure sufficient space in front of stoves and dishwashers for door swings. In a narrow kitchen, maintain a minimum of 3 feet in front of the stove to prevent obstruction when opening the oven door.
By carefully considering these measurements and clearances, you can ensure your new kitchen is both beautiful and functional, with appliances and fixtures that fit perfectly within your remodeled space.
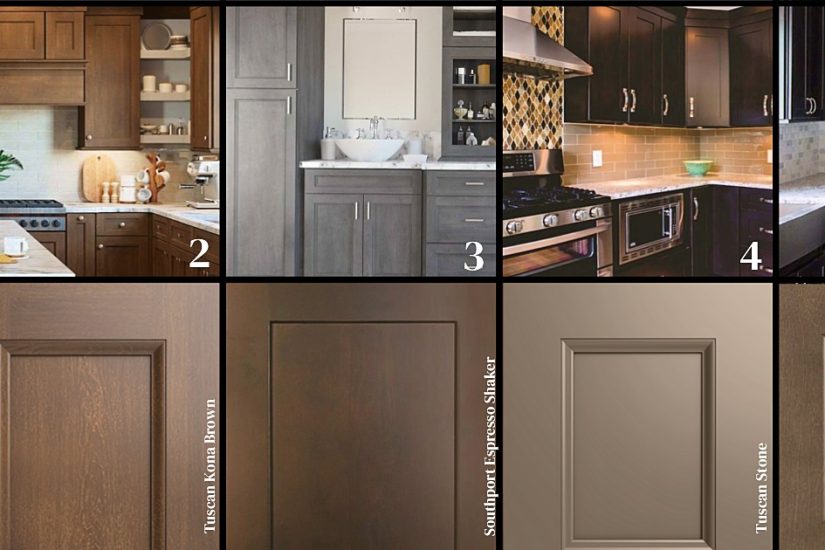
Cabinet Dimensions Demystified: A Quick Guide for Kitchen Planners
Unlock the secrets of kitchen cabinet sizing with this concise guide. From base to wall to tall cabinets, discover the standard dimensions that will transform your kitchen design from guesswork to masterpiece.
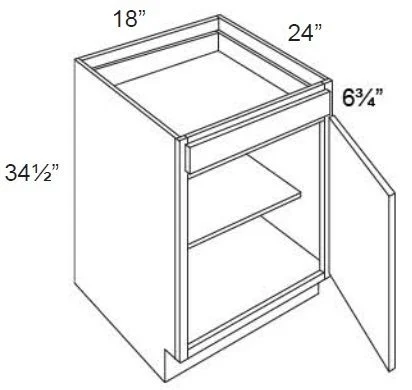
Base Cabinets: The Foundation
- Height: 34.5″ (36″ with countertop)
- Depth: 24″
- Width: 18″ to 36″ (3″ increments)
Wall Cabinets: Eye-Level Excellence
- Height: 30″, 36″, or 42″
- Depth: 12″
- Width: 12″ to 36″ (3″ increments)

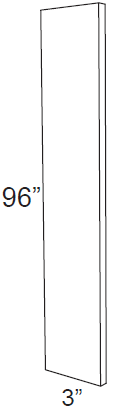
Tall Cabinets: Vertical Virtuosos
- Height: 84″, 90″, or 96″
- Depth: 24″
- Width: 18″ to 36″+
Remember, while these standards are a great starting point, the perfect kitchen embraces customization.
Mastering Space in Kitchen Design
In the world of kitchen design, proper spacing is the unsung hero of functionality and flow. As our savvy homeowner discovered, strategic clearances between cabinets, appliances, and walkways can transform a kitchen from cramped to comfortable.
The Golden Rules of Kitchen Spacing
Here are the key kitchen spacing rules: maintain a 1-2 inch gap between base cabinets and appliances for ventilation; position upper cabinets 18-22 inches above countertops for appliance clearance; allow a 42-inch space around islands for easy movement during gatherings; ensure drawers and doors have 15-24 inches of clearance when fully extended; and provide at least 36 inches of walkway space for stress-free meal prep
Mastering the Art of Corner and Specialty Cabinet Measurements
Navigating the tricky terrain of corner and specialty cabinet measurements can be a game-changer in kitchen design. These unique cabinets not only maximize storage but also add a dash of personality to any kitchen. Let’s dive into the world of precise measurements with some real-world examples.
Cracking the Corner Cabinet Code
Corner cabinets come in various flavors – lazy Susans, diagonal cabinets, or L-shaped wonders. Each type demands its own measuring strategy.
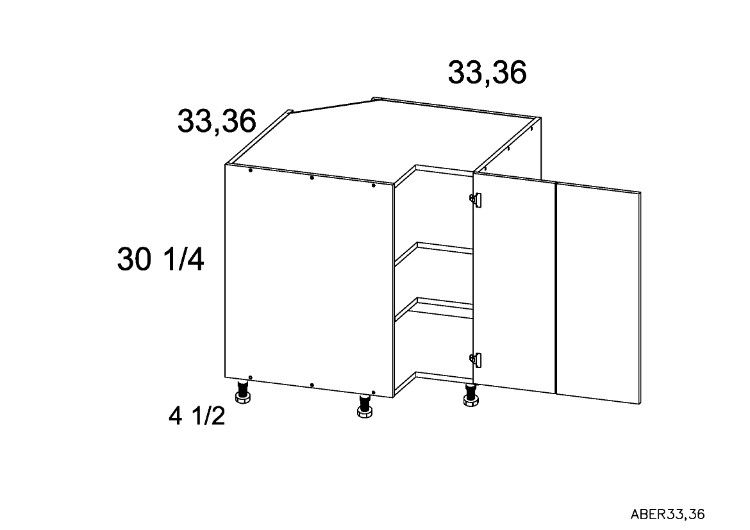
Picture this: A homeowner decides to install a lazy Susan in their kitchen corner. They start by measuring the adjacent walls – 36 inches on one side and 30 inches on the other. With a 36-inch diameter lazy Susan in mind, they ensure at least 18 inches of wall space on each side for a snug fit.
Sizing Up Specialty Cabinets
From pantry cabinets to pull-out spice racks, specialty cabinets require an eagle eye for detail.
Imagine a kitchen enthusiast eyeing a tall pantry cabinet. They measure floor to ceiling, accounting for any flooring quirks or molding – let’s say 84 inches. For width, they measure between walls (30 inches) and subtract their desired cabinet depth (24 inches). Voila! A perfect fit for their dream pantry cabinet.
Unveiling the Art of Precision: Cabinet Pro’s Measuring Secrets
In cabinet installations, the difference between a good job and a masterpiece lies in the details. As a seasoned professional, I’ve discovered that measuring is an art that requires a keen eye and a thoughtful approach. Join me as I share insights to elevate your next project from ordinary to extraordinary.
Picture yourself in a kitchen, tape measure in hand. The focus isn’t just on empty walls; it’s on existing elements like crown molding and baseboards. These features aren’t obstacles—they’re opportunities to showcase your expertise. By accounting for these trims, you ensure your cabinets align perfectly, blending old and new seamlessly.
Next, consider the corners. Corner cabinets, especially those with lazy Susans, require foresight. You must envision door swings and shelf rotations, allowing for ample clearance to ensure functionality.
Look upward at where the upper cabinets will be installed. The ceiling is your canvas, and you must note any variations—slopes or beams—to ensure a perfect fit.
Throughout this process, your sketchpad is essential. Each measurement and observation forms a blueprint of your vision, capturing the essence of the space.
As you step back to assess your work, you realize that measuring is about laying the foundation for transformation. Whether you’re a DIY enthusiast or a fellow professional, these considerations elevate installations into works of art.
Ultimately, it’s this attention to detail that distinguishes the good from the great. By embracing these principles, you’re not just installing cabinets; you’re creating spaces that will be cherished for years to come—truly the measure of success.
Recording and Organizing Measurements for a Kitchen Remodel
Once all measurements are gathered, it’s crucial to record and organize them effectively. This not only provides essential information for discussions with contractors and cabinet retailers but also helps streamline the kitchen remodel process. Here’s how to do it:
1. Create a Measurement Worksheet
A dedicated worksheet is invaluable for tracking kitchen cabinet measurements. Whether it’s a simple document on a computer or a printed sheet, organizing sections for different cabinet types, wall measurements, and notes on appliances is key. Here’s a quick example:
Wall Measurements:
- Wall 1: 12 feet
- Wall 2: 10 feet
- Wall 3: 8 feet
- Wall 4: 5 feet
Upper Cabinets:
- Width: 30 inches
- Height from Countertop: 18 inches
Lower Cabinets:
- Width: 36 inches
- Height: 34.5 inches
Appliances:
- Refrigerator: 36 inches wide, 70 inches tall
- Sink: 30 inches wide, centered on the countertop
Notes:
- Window on Wall 2 (3 feet wide, 4 feet from the floor)
Electrical outlet near the stove (2 feet from the counter)
2. Use a Graph or Visual Layout
Sketching a layout on graph paper can be incredibly helpful in visualizing the space better. Marking walls, windows, doors, and appliances allows for a clearer understanding of how everything fits together.
3. Incorporate Photos
Taking photos during the measuring process is a great way to capture details. Snapping pictures of walls, windows, and tricky spots—like soffits or vents—can provide visual references later on. Labeling these images with notes adds clarity.
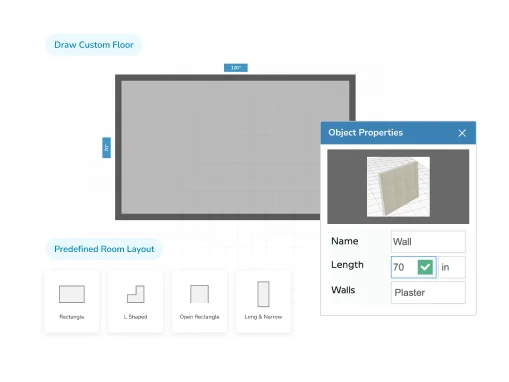
4. Leverage Digital Tools
Incorporating technology can simplify measurement recording. Numerous apps are available that allow for digital input of measurements and even generate 3D layouts of the kitchen. Using a tablet or phone makes it easy to adjust figures as design ideas evolve.
5. Checklists for Accuracy
Finally, creating a checklist ensures all necessary measurements are accounted for. This should include measuring all walls, checking fixed appliances, noting offsets, and allowing space for clearances.
Double-Checking Measurements for Accuracy in Kitchen Renovations
The age-old adage “measure twice, cut once” holds especially true in kitchen renovations. After taking initial measurements, it’s wise to wait a day before revisiting them. This pause allows you to approach the task with fresh eyes, potentially catching any oversights from the first round.
Cross-referencing measurements is another valuable strategy. By measuring from both ends of a wall, you can compare dimensions and ensure consistency. If the measurements match, it’s a reassuring sign of accuracy. If they don’t, it’s an opportunity to investigate and resolve discrepancies before they become problematic.
Utilizing multiple measuring tools can significantly boost your confidence in the accuracy of your measurements. Start with a traditional tape measure for initial dimensions, then follow up with a laser measuring device for precise confirmation. This dual-tool approach combines the reliability of tried-and-true methods with the precision of modern technology.
Don’t hesitate to enlist help in your measurement verification process. A second set of eyes, whether from a family member or friend, can provide valuable perspective and catch details you might have missed.
Careful documentation is crucial throughout the measurement process. Write down all measurements clearly, categorizing them by room and cabinet type. This organized approach ensures easy reference and comparison later, reducing the likelihood of confusion or errors during the installation phase.
To streamline the process and ensure thoroughness, consider creating a simple measurement checklist. This tool helps you cover all necessary dimensions, including often-overlooked details like appliance sizes and clearance spaces.
By implementing these verification techniques, you’re not just double-checking measurements – you’re laying the groundwork for a smooth, successful kitchen renovation.
Additional Details and Notes for Kitchen Cabinet Measurements
When measuring for kitchen cabinets, capturing extra details can prevent future headaches. While precise measurements are essential, documenting additional information ensures a smoother installation process and a perfect fit.
What to Include in Your Documentation
- Wiring and Plumbing Notes
It’s vital to note the locations of plumbing pipes and electrical outlets around sinks and stoves. This information will influence the placement of lower cabinets and countertop arrangements. - Ceiling Heights and Features
Record overall ceiling heights, noting any unique features like slopes. For instance, if the ceiling height varies from 96 inches to 94 inches, document these dimensions to ensure upper cabinets fit properly, especially if crown molding is planned. - Diagrams and Sketches
Creating a simple sketch of the kitchen layout helps visualize door, window, and appliance placements. Include window dimensions (e.g., a 48-inch wide by 36-inch high window) and its distance from the countertop (18 inches) to ensure adequate clearance for upper cabinets. - Specialty Features
Document any unique elements in your kitchen, such as fireplaces or bulkheads above cabinets. - Desired Hardware or Accessories
Make a note of preferences for cabinet pulls or knobs to streamline the design process.
Keeping Everything Organized
To manage this information effectively, consider creating a spreadsheet. Each row can represent a different wall or feature in your kitchen, with columns for key measurements, notes on obstacles like wiring or plumbing, and sections for sketches or diagrams. This organized setup allows for easy reference while shopping for cabinets or discussing designs with contractors.
Common Measuring Errors to Avoid in Kitchen Renovations
Even the most experienced DIY enthusiasts can stumble into measurement mishaps that lead to costly delays and frustrations. To help you navigate these potential pitfalls, let’s explore some common measuring mistakes and how to avoid them.
First and foremost, dimension dilemmas can wreak havoc on your renovation plans. Misinterpreting measurements or accidentally adding extra inches can throw off an entire project, so it’s crucial to double-check every number with meticulous care.
Equally important is accounting for fixed elements like light switches, outlets, and plumbing fixtures. These immovable objects are often overlooked by novice renovators, but savvy DIYers always factor them into their plans. Don’t be fooled by seemingly straight walls – they can hide subtle curves and bumps that could derail your cabinet installation.
To uncover these hidden challenges, measure at multiple points along each wall. Similarly, uneven floors can make even perfectly measured cabinets look askew, so perform a level check before taking any measurements. One of the most common pitfalls is the temptation to purchase cabinets prematurely. Remember the golden rule: measure twice, buy once. This simple mantra can save you from the heartache of ill-fitting cabinetry and unnecessary returns. Lastly, resist the urge to overcomplicate your measuring process. Focus on the key measurements that directly impact your cabinet choices, and use a straightforward checklist to stay organized. By keeping it simple and following these guidelines, you’ll be well on your way to a smooth and successful kitchen renovation.
The Ripple Effect of Imprecise Measurements
Inaccurate measurements in kitchen renovations can set off a domino effect of issues, turning dream kitchens into nightmares. From mismatched cabinets to costly adjustments, the consequences can be far-reaching and frustrating.
Space Woes and Budget Blows
Imagine cabinets that don’t quite fit, leaving awkward gaps or overlapping edges. Or picture valuable kitchen real estate wasted due to poor planning. These scenarios aren’t just aesthetically displeasing; they can lead to significant financial setbacks. One contractor recalls a single-inch miscalculation that necessitated replacing all drawer fronts, a costly mistake that could have been easily avoided.
Structural Surprises and Timeline Troubles
In some cases, measurement mishaps can even require structural changes, turning a simple renovation into a major overhaul. Moreover, these errors often cause delays, extending project timelines and leaving homeowners without a functional kitchen for longer than anticipated.
The takeaway? Measure twice, cut once isn’t just a catchy phrase—it’s a golden rule in kitchen renovations that can save time, money, and a whole lot of headaches.
When to Call in the Pros for Kitchen Cabinet Measurements
Complex kitchen layouts with odd angles and hidden nooks can turn a simple measuring task into a perplexing puzzle. In such cases, professionals equipped with specialized tools can navigate these intricate spaces with precision, ensuring accurate measurements that DIYers might struggle to achieve.

High-end or custom cabinets often come with their own set of requirements. An expert well-versed in the nuances of premium cabinetry can ensure these costly investments fit perfectly, maximizing both functionality and aesthetics.
Time constraints can also be a deciding factor. With looming holidays or tight renovation deadlines, a professional can expedite the measuring process, keeping your project on track and stress levels in check.
Unexpected challenges, such as hidden plumbing or electrical issues, can throw a wrench in even the best-laid plans. Professionals are adept at handling these surprises, adjusting measurements and plans to circumvent potential problems down the line.
Sometimes, the decision to hire a pro simply comes down to peace of mind. Knowing that a seasoned expert is overseeing this crucial aspect of your remodel can be invaluable, potentially saving you from costly mistakes and ensuring your dream kitchen becomes a reality.
In the grand scheme of kitchen renovations, recognizing when to seek professional help with measurements can be the key to transforming your space from a potential measuring nightmare into the kitchen of your dreams. After all, in the world of home improvement, sometimes the smartest DIY decision is knowing when to call in the experts.
Final Measure
Measuring for kitchen cabinets doesn’t have to be an arduous task. With a little patience and precision, you can ensure a perfect fit that transforms your kitchen into a functional and stylish space. Remember to double-check your measurements, consider the layout, and account for any appliances or fixtures. Armed with this knowledge, you’re ready to embark on your kitchen renovation journey with confidence!
Unlock Your Creative Potential Today!
Subscribe to our email list now and gain exclusive access to our incredible free room design tool! With this innovative resource, your DIY projects will become effortless and enjoyable. I’m excited for you to discover how easy it is to transform your space with a touch of creativity.
Don’t let this opportunity pass you by—join our community today and start designing your dream rooms!