Installing a new kitchen faucet is an easy DIY project that anyone with moderate plumbing experience can tackle. Follow this step-by-step guide where we show you how to install a kitchen faucet.
Step 1: Check how many holes are in your current sink.
Open the kitchen cabinets beneath your sink and look under. You should see one to four holes. This is important to know when buying your new faucet. If the new faucet has fewer holes, you can use a deck plate to cover them or choose to install a soap dispenser or another kitchen sink accessory.
Step 2: Gather tools based on the manufacturer’s instructions.
Following these steps will help you install a kitchen faucet, but it is important to also reference the manufacturer’s instructions. This will clarify what particular tools you need and give additional directions for working with their product. Expect to need a basin wrench, adjustable wrenches, putty knife, plumber’s tape and putty.
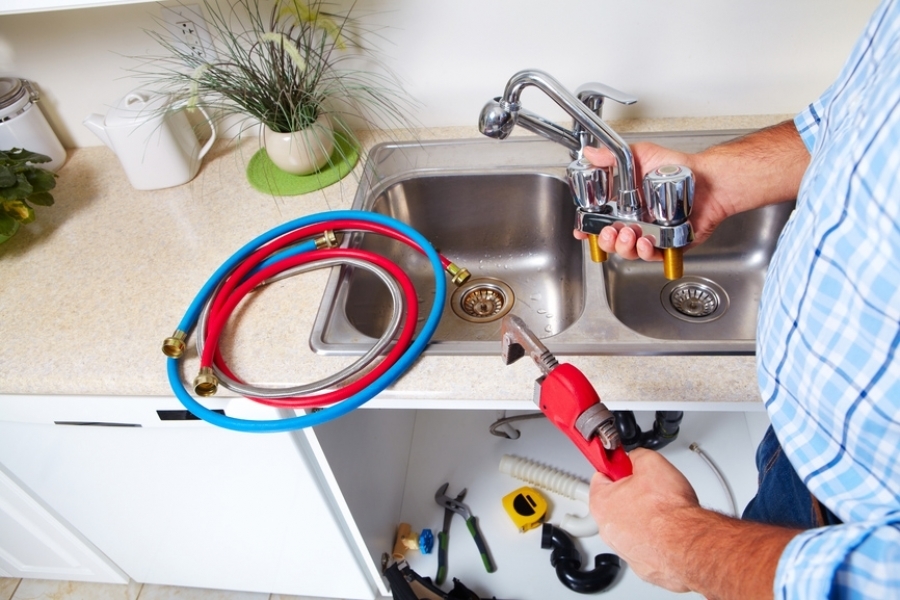
Step 3: Remove your old faucet.
First you will want to turn off the hot and cold water valves. Then turn on the faucet to release the pressure. Disconnect the water supply line by using your adjustable wrenches. If the lines are in good condition you can reuse them, but if not you will want to replace them along with your new faucet. To remove the old faucet, use your basin wrench to unscrew the bolts and then simply lift it off.
Step 4: Prep for your new faucet.
Clean the area where the old faucet was previously attached. If there is old adhesive, use your putty knife to scrape it off. You want the surface to be clean so that your new installation is done correctly.
Step 5: Install your new faucet.
Begin assembling your new faucet by turning your deck plate upside down and placing the putty plate on top. Then apply plumber’s putty into the indentation (be sure to press it in tightly as this prevents water from damaging your kitchen cabinets in the future). Turn the plates right side up and press them securely into the sink holes. Direct your pipes through the holes and then put on your washers and mounting pieces. Turn the nuts using your hand and then use your wrench to tighten completely.
Step 6: Turn on the water supply line.

Turn on the water supply line and then join the faucet’s water connection with the supply lines using a wrench. You may want to use plumber’s tape to secure the connection, but this is optional. At this point, your project is complete and you can turn the water on to see if there is any leaking. You should check this twice, at first with your faucet off and then with it on. If any water is coming through, tighten up the connection and try again.
Updating your faucet? Why not update your sink too! Did you know TheRTAStore has a great variety of beautiful new kitchen sinks to choose from? Visit our website today!